Sweet to snarky handmade cards using Crackerbox Stamps.

Saturday, February 16, 2013

Trena Brannon's Teriffic Cards

I wanted to share some cards from a stampin' sister. I met Trena at a stamping retreat, and I liked her from the moment we said hello. She has such a big warm smile and her energy went through the ceiling and her laugh comes from her heart.
I just had to show off Trena's cards. She made these cards with Crackerbox Palace stamps. She has some more great cards on her blog where you can see them here.
I don't know what your weather is like where you are at, but here it is cold and we have snow on the ground. So I thought these might brighten up your day and think of spring.
I think the thought bubble on the ants were a good idea, don't you?
 I like the stripes on the apron that Trena added.

 Trena used Stampscapes for the ocean which goes with Clara.
 Here are some cupcakes for any occasion.
Doesn't this look just Yummy?
I hope you enjoyed Trena's cards and stop on over to see what else she has made. Trena's blog.

Share:

Thursday, February 07, 2013

Sweet Friend Card

Hello Stamper,
The saying, Day To Day was stamped on parchment-colored card stock, then cut out with Spellbinder die. I used a VersaMark pen around the outer edge to darken it (the card stock is so light it doesn't show up too well).
The Rose Long Stem in the corner was stamped and fussy cut.
I added pearls of two different colors on the 4 sides.
Hope you are having a great day!
Vicky


Share:

Tuesday, February 05, 2013

Rubber Stamp Madness Magazine

HAPPY DAY!
A couple of my friends and I were published in the Spring RSM magazine. I really liked this issue ~other than seeing my friends being published :) ~
it has all types of cards, from CAS to artsy. I had a fun time reading the stories they put with the cards. The stories just make the cards even more fun. I hope you pick up RubberStampMadness and take an adventure through the magazine.
The next few cards are under the Incredible Edibles section where you can read the stories.
This one is from Judi Downing named From My Oven on page 38. This is a perfect card for Judi to make since she does a lot of baking and all of us who know her, loves it when she shares her baked goods that are filled with love.
 
 
Here is a closeup of Judi's card.
The saying is from Crackerbox Palace.
The girl image is from Door County rubber stamps. 
The next one is from Currie Churchill. She has such a great sense of humor! This one is named Hanging On and it's on pg 39.

This is the close up of Currie's card.
All stamps are from Crackerbox Palace.

This is the card I sent in, (Vicky). This is a card that I had been thinking about for a while and just had to do it and get it out of my head! :0)
It's called Ant Picnic on pg. 42

This is a closeup. It's done with Crackerbox Palace and Stampscapes stamps.

 This card that Trena did is under the Going Green which is anything green. Her card is named Lucky Frogs pg 56. You can see her post on her blog here.
 The stamps she used are from Crackerbox Palace and Stampscapes.

I hope you can take a look at RSM for some great inspiration.
Share:

Sunday, February 03, 2013

Beautiful Sympathy card from Jane

Sympathy cards are not always easy to make so I wanted to share the beautiful card that Jane made.  Jane got one of our stamps and made this wonderful sympathy card.  Here is Jane's Crafty Cabin blog to find out about the card. Hope you hop on over to her blog, she has very beautiful cards on her blog that I am sure you would just love to see.
The saying is from Crackerbox Palace and the picture is from The Market Place.
 
Share:

Sunday, January 20, 2013

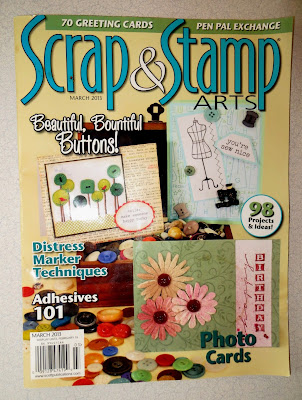
Scrap & Stamp Magazine Take 5 Queen of Stamping


I just wanted to share some exciting news with you. I hope a lot of you are familiar with the Scrap&Stamp magazine. Scrap&Stamp is packed with information for everyone. The have a lot of techniques with easy to follow instructions. Full of great ideas. This issue has 98 projects and ideas, with 70 greeting cards, along with distress marker technique.

What I am getting to is the article that Gail Green did on the Take 5. She called it Queen of Stamping. Gail took our queen and made 5 beautiful cards with her so you get 5 different ideas with a stamp.
If you haven't gotten this magazine, I sure do hope you go out and get it. I like the article on how they make custom brads.
Here are the cards that Gail made.


Hope you pick up your copy today.


Share:

Wednesday, January 02, 2013

Card by Cazzy

I just wanted to share a card the Cazzy made with Crackerbox Palace Santa and reindeer stamp.
ox
This is what Cazzy wrote:
Christmas Eve make, delivered to a neighbour at 11:30. I was making quick cards by this time, and this was the Crackerbox Palace santa and sleigh stamped onto linen effect card which was embossed with the snowy village and I added Ice Stickles to highlight that image. Crafty Ribbons of course, and by the time I got to Boxing day and still making cards I had refined this a little but didn't take more photos so I need to make some more so I can!
 

Share:

Sunday, December 30, 2012

ATC Winter

Hope everyone is staying warm. It is getting a little chilly here in WI.  
 
I just wanted to share with you a ATC card.
I started with tan parchment card stock and stamped some snowflakes with Brilliance ink. I cut out the two frames from Spellbinders. I left the die on the one with the saying and sponged Brilliance ink around the edges. The snowflake in the corner is a button that I cut the shank off of and added glitter to the center.

The trees have Flower Soft below them to look like snow, and glitter for the snowflakes coming down.


Share:

Thursday, December 27, 2012

A Thank You AND Thinking of you Cards

Hi friends,
I thought I would do a thank you and thinking of you cards.
The first one I used Flowers In Vase stamp, and Thank You Very Much Script
 
I used Cuttlebug Quilling flowers and put a pearl inside the center of each one.
I used the saying, Wonderful Things.
 
Smiles, Vicky


Share:

Monday, December 17, 2012

Cazzy Blog Candy Card

Hi Stampers, I wanted to share with you a card that Cazzy made from some of the blog candy she won. If you would like to visit Cazzy's blog, here it is: Cazzy Time
This is what Cazzy wrote:
I am still playing with my blog candy stamps from Crackerbox Palace, this time I decided to make a square card, then I turned it into an easel card, it is perfect for this because the paper behind the cut houses is covered with the part that attaches it to the card blank.
I think this is a really neat card, I like the way she made it into a easel card so it stands up with Santa flying across the sky.
If you would like to find out how Cazzy made the card stop by Cazzy's blog and find out!
Hope you enjoyed Cazzy's card as much as I do and hope you leave her a comment.
 
 
Share:

Thursday, December 13, 2012

Two Funny Christmas Cards

Hi Stampers, 
On my first card, a little guy is looking for candy in the sock.
I stamped Dog In Sock with Memento Ink and then the saying, Christmas Time.
I put stickers around the edges and used nail heads in the corners.
I put white flock on the stocking
 
The second card is a funny Santa card.
 Santa and 8 Reindeer and the saying, Master and Visa was stamped with VersaFine Clair. This ink is perfect for fine detailed stamping.
The snowflakes are cut out from glitter foam sheets.
The snowflake in the middle is a button that I cut off the shank.

 
Smiles, Vicky


Share:

Sunday, December 09, 2012

Merry Christmas Santa

Are you getting ready for Christmas? I got a little shopping done but without snow here in WI. it's hard to believe Christmas is only a couple of weeks away. But I still got out the Christmas stamps and made a couple of cards in hopes that it would put me in the Christmas mood.
I try to keep my Christmas cards more CAS. I stamped and embossed the Merry Christmas.
I stamped the image and colored it with Copic markers then cut it out as well as the red background scalloped circle with Spellbinders.

I tried to show the glasses with clear lacquer.

Share:

Thursday, November 29, 2012

Two Christmas Card With Santa And Snowlady

Hi Stampers, OH OH OH, Christmas is coming fast.
My first card is a Step Card.

This card is 51/2x81/2. The directions are farther down.
I stamped the saying, Merry Christmas Script with VersaFine Clair
Snowlady With Tree was stamped and mounted.
I measured and cut the pink in one piece. 
I stamped the snowflake border with Martha Stewart's punch. I used the punched snowflakes and glued them back on the card.  
Here is what the card looks like on the side with the folds.

This is how the card was cut and folded. I put it sideways on the scor-board and from the end scored it at 21/4, 41/4 etc.


This one is pretty straightforward. Stamp and embossed the saying, Merry Christmas Calligraphy then cut it out with Spellbinder.
I stamped Santa with Toys on white and colored it with Copic.
The white circle, green scalloped, and red circles are cut with Spellbinders.

This is just to show all of Santa's toys.

Smiles, Vicky

Share:

Wednesday, November 21, 2012

Autumn Blessing

Happy Thanksgiving
Chick made the card with Crackerbox Palace stamps.
The leaves and saying are stamped on white card stock and painted with Smooch and cut out with Spellbinder die.
The red oval and black scalloped are cut out with Spellbinder also. The black pieces around the image that are over the red oval are the scrap pieces from the punch.
The strip across the card was embossed with Cuttlebug and just cut a strip of the folder size card. The black strip behind it has been punched with Martha Stewart punch.
The acorn and leaf are embellishments bought. They were also painted with Smooch.
 
Everyone at Crackerbox wishes you a Happy Thanksgiving.

Share:

Thursday, November 15, 2012

Birthday Card With The Road Master Car

Hi Stampers, Vicky here this week.
The card today is a birthday card for some special guy. I stamped the Road Master on Ex-Press card stock and colored it with Copic markers. I did color the chrome on the car with a silver pen. The image was cut out with Spellbinders, and then I sponged the edges with Distress Ink. I cut a dark red cardstock to back the image. I added the silver Nail Heads in the corners to accent the silver from the car.
I stamped the Birthday Banner, cut it out, and sponged the Distress ink on the edges of that, too. 
 
Smiles, Vicky


Share:

Monday, November 12, 2012

Autumn Blessing

HAPPY FALL
 
Chick made this card. She started with putting green card stock on a dark brown card. She used Spellbinder 12" leaf border and sponged Brillance green over the leaves and put a ribbon through the loops in the border. A piece of dark red was cut for the left side of the card where Chick put the ribbon and leaves. On a scrap piece of gold paper, she stamped and colored Autumn Blessings and cut that piece with Spellbinder. The pumpkin from Spellbinder was cut out 7 times and folded in half and glued back to back. She added some of the left over leaf border to put over the pumpkin. The saying on the right side of the card was stamped and embossed, (that's why the word God is reflecting the flash). Then last added the 3 embellishments on the upper right hand side of the card.
Thanks for stopping by. Vicky

Share:

Thursday, November 01, 2012

Get Well Bug Card

It is cold season here in WI. so I made a get-well card idea.
This little bug, Sally-Monella is one of a set of 3. You can get her or the set of 3 together.
She fit well in the Jar. The frames were cut with Spellbinders. When I cut the white one, I left the die on and graced it around the edge to frame it.
Smiles,Vicky
Share:

Monday, October 22, 2012

Ghouls Got Blood

Another Halloween idea. My grandson loves this stamp, so I thought I would use it for his card.
 I stamped the image, colored it with Copic markers then cut him out. I cut out the green and purple frames from Spellbinders. Before I took off the die, I sponged black ink in towards the middle. The last frame is just cut a little bigger and I used corner punch. For the saying, I stamped the work Ghouls on green and cut out the O. I stamped the spider wed in the corner and added glitter to it and to the G. I wrapped the card with thread and it came through the web and I put the spider button at the end of it.
Here is the spider.


Share:

Monday, October 15, 2012

Bat Bag

Real quick Halloween Bag.
The bag is cut from Tim Holtz die cut. Sponged black ink around the edges.
Stamped and embossed the staying on green card stock. I cut out the saying with the deckle sissors also sponged black ink around the edges. I stamped the bats on the bag and it is ready to be filled!

Share:

Shop Crackerbox Stamps

Search This Blog

Translate

Blog Archive

 
09 10