Sweet to snarky handmade cards using Crackerbox Stamps.

Wednesday, February 24, 2010

Currie's Caught a Bug

Isn't this a cute card Currie made?
This is a smaller tri fold card.  I think she cut out the shape for the words with her Cricut and edged it with blue ink.  The edges are cut with a deckle scissors. The bug is colored with Copic Markers and it looks like she outlined the eyes in black to make him look like a nasty bug.  The jar looks like it was colored with Copic markers also and blended out. 

The front flaps opens to the left and this is the second (right) flap, but this opens to the inside.
And this is the inside.  Again the cutout shape is the same as the front and inked on the edges.
This is a real cute card that would make a great card or a gift tag.
Share:

Tuesday, February 23, 2010

Yellow Daisies from Currie

This is another look at the daisies.  I am guessing that she used Copic markers to color the daisies and water.  She distressed the edges of the white and striped paper and then inked the edges.  She inked the background nicely to get rid of the "white out" background.
Inside of card:
She rounded the corners and inked around the edges of the white and inked the background again.
Looks great Currie!
Share:

Monday, February 22, 2010

Currie's Pink Flowers

Currie colored these flowers with Copic markers and cut out the center shape with the Storybook cartidge with Cricut.  The brown corners are simply a square cut at a diagonal. A very quick, easy and great looking card to give for any occasion.
Share:

Sunday, February 21, 2010

I Wish I Was a Bear by Currie

I loved the way she made the hills, and I think the trees look great too.  She used Prisma Color Watercolored Pencils and a  water brush on watercolored paper.  She edged the dark green base card with the Fiskars Edge Punch and tired embrodery floss in each hole, what a great look of brown 'hair like' look!!  Great Job Currie!
Share:

Saturday, February 20, 2010

Currie's Birthday Star

Currie made this card with our friend Spot and the Happy Birthday.  She cut out the star with the Wild Card cartidge from Cricut. I like the was she hand stitched around the outer edge. An added embellishement without ribbon.  She also used the Copic markers and Prismacolor watercolored pencils.  The dots around the star were made with a gen pen.  I think this would make such a great card for any age guy, short one or tall one! 

I think this is just a great card!
Share:

Friday, February 19, 2010

Miss Crabby by Currie

Believe it or not, this has been a real good seller for us.  It is another way to say "Cheer UP!". Here Currie did a real good job with the color combination of her paper and ink.  I loved the way she did the distress look with the edge scraper.  And the cut corner pieces make it interesting by being a different size as well as the different size brads.  She used the Cuttlebug Mesh Embossing folder and it framed it beautifully.
Share:

Thursday, February 18, 2010

The Golden Years by Currie


Currie combined a bit of elegance and humor. She used the Cricut Storybook Cartridge for the center shape and out lined it. She stitched the red star shapes with embroidery floss, it really added a nice contrast.  The ribbons on the top of the card are a great embellishment especially with the added red buttons to match the floss.  If you notice the buttons are not all the same, and that adds an extra interest.
Share:

Wednesday, February 17, 2010

Currie's Happiness Fairy

I think Currie did a really good job on this one.  I like that it can be a quick card for the times you need one right away and it looks complete and clean.  This card can be used for just about any occasion, or someone who just need a smile.  And if you have a glitter, just put it inside as Happy Dust for the unexpected surprise!  She used Copic Markers, Bic Mark-It fine markers and Gelly Roll Metallic Pen.
Share:

Tuesday, February 16, 2010

Birthday Voodo by Currie

On this birthday card Currie used Copic markers and Prisma color water colored pencils.  Didn't she do a great job?  I really like the color combination of her card stock.  The card just makes you smile!
Great job Currie.
Share:

Monday, February 15, 2010

Currie's Happy Valentine's Day

Well, the day is here to start showing you the great cards from Currie, I am so glad you stopped by to take a look !
I know I should of started Currie's cards yesterday because one of them is a Valentine's Day card, but I had a blonde moment (or a full minute).  Even though it is a day late, it would be so easy to change the words and use it as a birthday or anniversary card.
Check back tomorrow to see another of Currie's card creations!

Share:

Friday, February 12, 2010

Currie is our new designer !

I wanted to announce that Currie has agreed to become one of our designers. You will be able to see her creations here.  On Monday, we will start to post her projects.  The other designers are very happy to have her on board, we loved her cards and I think you will too.  I asked Currie to introduce herself, and this is what she wrote.

I really wouldn't know what to write when it comes to the introduction thing. I started making cards with my daughters (9 and 4 years old) as just something fun for us to do together and ended up loving it. I'm a stay at home mom and my husband says I live in my own world. I tend to think that's funny not bad.
Mike is my husband, we have been married 13 years. Madison (9) and Allison (4) are our daughters. Madison is all about rules and being good, Allison is just the opposite. They both are great at art. Allie once drew a perfect self portrait on her stomach with a permanent marker. I love being home with them (even on their worse days). Once in a great while my mom will watch the girls but its rare. I figure if anyone is going to screw them up it's going to be me! Mike works for M. L. Chariter. They do everything from clean up contaminated spills to drill oil wells. We laugh alot and try to find humor in almost everything. I don't like stuffy or up tight, it makes me uncomfortable. Our dog's name is Izzy. She is a chihuahua mixed with a yorkie.

I wish you a wonderful day!!!


Currie Churchill

Don't forget to check back starting Monday, to check out Currie's card creations !!
Share:

Monkey Love Valentine

This is just a quick Valentine I made for Taylor this morning, I need to send it out today.
I used Cuttlebug Swiss Dots for the background on the purple. Everything else was cut out with Spellbinders and colored with Copic markers, I used Smooch over the heart the monkey is on and the small hearts to the right.
Share:

Saturday, February 06, 2010

Written Love Valentine

Just a quick Valentine card. All of the black lined images are embossed. The pen on the stamp does have a heart on it, but I used small heart stickers over them. The heart on the envelope is colored with Smooch as well as the rose.
Share:

Monday, February 01, 2010

The WINNERS are.....

We have 2 winners of the $25.00 of free stamps from the Crackerbox Palace.
The first one is Cazzy, and her blog is  IT'S CAZZYTIME! her blog is:  http://cazzytime.blogspot.com/
and Vicki, and her blog is Viceroy's Variations and her blog is: http://hillhavencreations.blogspot.com/.
I hope that you visit their blog and enjoy their talents.
I will need both of you to email me at jvbriggs@charter.net so I can give you your coupon to use at the online store on your choice of stamps.
Congrats!
Share:

Sunday, January 31, 2010

Monkey Heart Valentine

This card Chick Alizadeh did a while ago for the store.  The heart print paper is cut the long way, 41/4 X 11.  The top pink piece is added as a flap.  The monkey is mounted on the black and only is attached to the top pink flap. There are a few saying that can be used in the inside.
Share:

Friday, January 29, 2010

I'm Mad about You Valentine


These two cards I did a while ago but I thought I would share them.  The top card is pretty straight forward.  The heart is an old earring I cut the back off of and the 'kiss me' is ribbon I bought.
The bottom card I used the Cuttlebug for the black corners and the frame is a large slide frame.
Share:

Tuesday, January 26, 2010

Be mine Valentine


I stamped the circle design and the Be Mine with no idea in mind.  I just started picking up scraps from my table and started layering the Spellbinder pieces I had laying there.  I just got in the new Martha Stewart punches in the store and played with the heart corner punch.  The little hearts around the Spellbinder cut out is the hearts from the corner punch.  I am still not sure if i really like the corners added to this piece, but what the heck.  The two stamps are from our store, which we offer just the rubber, rubber on cling foam or wood mount. Thanks for looking.


Share:

Saturday, January 23, 2010

Happy Feet by Claudia Schroedl


Claudia used the Happy Feet for her birthday card.  She folded the gold cardstock and stamped the image on the fold and cut it out.  She stamped the feet again on flesh colored cardstock and cut the feet out and glued them to the gold cardstock.  The background was done with the Cuttlebug birthday embossing folder.  The purple piece of cardstock is a single sheet, the rust color cardstock that the feet are stamped on is folded and the inside 'Birthdays are good for you, the more you have the longer you live'  saying is in there.


Claudia used the feet again for a get well card.  The outside saying is from Great Impressions-C134. The inside saying is a get well.  She stamped the image on blue cardstock and embossed with Swiss Dots from Cuttlebug, then she stamped the image again on flesh colored cardstock and cutout the feet and glued them to the blue.

This is one of my favorites.  She again, stamped the image twice and cut out the feet.  She then wrapped the leg with gauze.  What a great touch! The inside saying is 'Hope you're back on your feet soon'.
Thank you Claudia for sharing such great cards!


We have the feet in 2 sizes and more sayings to go with them on the web site.
Share:

Thursday, January 14, 2010

Be My Valentine

It is only 1 month before Valentine's Day! 
Just another Valentine card. I used Spellbinders for the heart and labels for the image.  In the flower department I found the pearls and just cut them to the size I wanted and then added seperate pearls at the bottom. I colored her with Copic markers.

Share:

Wednesday, January 13, 2010

Bugs & Hugs Valentine

I thought I would make a Valentine's Day card without hearts, my husband said some guys just don't care for hearts.  Usually I don't put rubbon on a guys card but I just had too for this one, but I didn't put a bow on it at least. I colored around the words with Smooch, it was very easy.  The bug was colored with Copic markers. I used Martha Stwart punches for the edges. I thought I cut the card stock the correct size but found that the sides didn't punch out right, so I cut them off between the corners.


Share:

Tuesday, January 12, 2010

Hogs & Kisses Valentine

I can't believe that January is almost half over.  I thought I better get a couple of Valentine Day Cards posted. I will start with our little porker.  I colored him with Copic markers.


I used Martha Stewat's grass punch.  The bottom layer of the grass is the scrap that was left over when I punched out the grass I wanted. Just flipped it around and put it on the bottom. The grass spears aren't as thin but it fills in the bottom real good and it is better than throwing it away!


Share:

Saturday, January 09, 2010

These 2 cards that Betty made can be used for a lot of ocassions, get well, birthday or Valentine's Day.  She embossed the card with a Cuttlebug folder.  She cut both centers out with a square Spellbinder's frames, punched holes in the corners and weaved in and out around the frame and knot it when you reach the beginning. The back is as pretty as the front.

She cut out the center with a rectangle Spellbinder frame and then punched the holes in the corners for the ribbon.  She added a safety pin with beads.


This is the inside of the card, the ribbon is just as pretty.


Share:

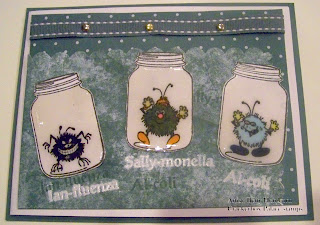
Betty's 3 Bugs

With the weather getting colder here in Wisconsin, Betty made a couple of get well cards.  She made a couple of different ideas with the same stamps. The jars on both cards are covered in lacquer.  The background paper on both cards were inked with a small brayer.
 On the first card Ian-fluenza was colored red but when Betty put on the lacquer, it turned it orange.  She embossed their names on the background with white embossing powder.

The names were stamped with VersaMark on the background and embossed with white embossing powder under the jars.

This is the inside of the card, and it flips up for your personal note and signature.

Share:

Thursday, January 07, 2010

4 Season Box

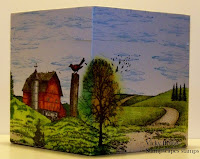
I thought I would share one of the gifts I made for a couple of my friends for their craft tables. I found the wooden boxes at Michaels.  I did 2 sides on one sheet of paper ( I used Crygon paper ). I stamped and colored with Copic markers before I glued them on the box.  I added clouds to the box and the lid so the lid would blend to the box better. I know I didn't use any of our stamps, I used mostly Stampscapes stamps, but I just love them too.


Spring


Summer


Fall


Winter


Spring / Summer side

Summer / Fall side

Top of box
Share:

Monday, January 04, 2010

Barbara Housner's Pink Cow


Barbara Housner made this card with our Bridgette cute cow. She made this card for a magazine Simply Sentiments and had it published.  I thought it was a very different on the way she stamped the cow on pink card stock instead of making it black and white.  Thanks Barbara, I have always thought this card was very unique. Her blog site is: papertherapyponderings.blogspot.com

F00504
Share:

Shop Crackerbox Stamps

Search This Blog

Translate

Blog Archive

 
09 10