Sweet to snarky handmade cards using Crackerbox Stamps.

Sunday, October 07, 2012

Eye Think I'll Have Another


I just don't know about the weather here in Janesville, WI. Last week it was in the high 80's and now we are in the 60's. I know fall is coming but it feels like it is 'falling' in fast. I am just glad to have the windows open and the air con off.
So, on to the card...With the Halloween parties coming up I thought I might do a invitation/card.
I stamped the image and cut out the frame with Spellbinders. Before I took the die off, I outlined the inner edge with the black Spica Marker.
The upper card looks kind of light because of the acetate over the glass and the embossed words reflected the flash.
 I stamped the glass on acetate and cut it out.  I colored the glass with Copic markers and covered it with clear lacquer. Then I put the glass I cut out of acetate over the lacquer. It made it look wet under the acetate. I thought I had a tooth pick with the frills on top to put on my card, but I couldn't find it.
There is a fabric mesh over the orange card stock behind the glass.
On the bottom of the card, I stippled black on the green frame I punched with Martha Stewart punches. I stamped the spider webs in the corners and added the Happy Halloween.-


Share:

Monday, October 01, 2012

Ghost Go Out

This card is a quick one. I cut the hole in the middle of the card with Spellbinder and used the next size circle to cut out the circle in the printed paper. Stamped the saying cut around it and mounted it with colored card stock.
I stamped the ghost and cut them out and added the saying and it is done!


Share:

Wednesday, September 26, 2012

Friendly Feet

'Just Because' card today. I really like the feet. We have it in a large size and this smaller size. It just makes me smile.
I did stamp, color and cut out the flower and put a pop dot behind it. The frames around the words are Spellbinders and then I put pearls on the ends.

Share:

Monday, September 24, 2012

Birthday Cards from Marla

Thank You Marla!
Marla won this stamp when she left a comment on our Thursday Blog Candy. Since she used her stamp, she gets to choose another stamp of her choice. Hopefully we will see another card from the stamp that she picks out. Stay Tuned!
 
This is what Marla writes about her cards:
These cards were made for special friends (extended family) celebrating their birthdays in August and September. I met these wonderful friends through Nana Vic's Digitals at CDAC. This year our Birthday Celebration Coordinator, Sharon, make us a beautiful cover and back to a fat page album. Then each of us make a fat page birthday card to be put into our album. An album we will treasure for years. I won and used this wonderful birthday sentiment on the back of these cards from Crackerbox Rubber Stamps. It is the perfect birthday sentiment and I will be using it many times in the future.

All paper used are from - DCWV Flower Shower Spring Stack (No longer available)
Inside sentiment - TLC Creations (old freebie)
Sentiment on the back - Cracker Box Rubber Stamps
Share:

Tuesday, September 11, 2012

Trick or Treat Angel

I love Halloween, I think it is my favorite Holiday. Dress up and eat candy, how could it get any better. The spider web in the upper left corner, and the rest of the stamps are from Crackerbox Palace stamps. I colored the angel with Copic markers and also used them to line the saying.
The bag is a small brown bag I bought and just sponged black ink around the edges. In a pack of paper, I found some candy punch outs that I used to keep the card flat. I would of liked to have had real candy!  The bottle top is one that came in a package I punched out with my 1" punch and put a clear dot over top.


Share:

Tuesday, August 28, 2012

Black Hat Society

With this heat I am ready for some cool weather, so I pulled out my Halloween stamps.
The background paper is the scraps I found and thought I should use them.
I cut out the orange mat and white paper for the image with Spellbinders. Before I took apart the image off of the die cut, I outlined it with Spica Marker.
I used a bottle cap for one of my embellishements. I add a clear bubble over the image in the bottle cap,
 
The spider here and the white skull in the lower right corner are buttons.
I put a gem on her hat and black Spica Marker for her hair. Stickles was added on her dress.
 
 
Here is the card again, the spider is in the corner.


Share:

Sunday, August 26, 2012

Thank You With Rose

Hello, here is a Thank You card with a beautiful flower!
On this card, Rose Lg. Open was stamped on X-Press card stock and colored with Copic markers, and then red Stickles were added. I cut out the image with Spellbinders, and while the die was still on the card stock, I outlined the die cut with the Black Glitter pen from Copic. I cut out a blue card stock and rounded the corners with a Martha Stewart large corner punch.
The Thank You Swirl was stamped with VersaFine Claire and cut with Spellbinder. 
I also cut out the green background with Spellbinder, put the red die cut on it, and added pearls.
I added a bow.
Thanks for stopping by Vicky

Share:

Sunday, August 19, 2012

Sweet Card For A Friend

Hello Stamper, here is a sweet card that is full of color.
The saying Friends Like Flowers was stamped and cut with a die. Blue was sponged around the edges while the die was still on, and pearls were added.
Blue Bell Flower was stamped 3 times, colored, and cut.
Hugs, Vicky


Share:

Tuesday, August 07, 2012

Blog Candy Thank You 7-26-12

Congrats Joyce!
Your card and stamps are in the mail.

On this card, I used Spellbinders for the frames around the saying and the bowl of popcorn.
I stamped the bowl of popcorn on printed paper and cut it out. I used Liquid Applique on the single popcorn and the bowl of popcorn.
The salt shaker just has glitter for the salt.

Share:

Saturday, July 07, 2012

Happy Birthday Lady

Thanks for stopping by.  The girls got together to celebrate a birthday for a friend of ours. So I had to hurry up and make a card before I left. Why make anything a head of time, always working at the last minute. 
The stamps are Crackerbox Palace (the lady and the small happy birthday in the corner) and the frames are cut from Spellbinders.  I colored her in Copic markers as well as the pink flower that is under the white one. The printed paper is mounted on the same green as the frame and then on a dark blue card.
Share:

Wednesday, July 04, 2012

Happy 4th of July

Happy 4th of July !
You may have seen the card above but I still wanted to share it today again.
The top card has 3 stamps. The center image is one stamp and then the flag and the saying.
The card below is our 4th of July kids. The flags in the corner was a pin and I just cut the back off.
Hope everyone has a happy and safe holiday.

Share:

Tuesday, July 03, 2012

Blog Candy Thank You Card Sea Breeze

Congrats Donna!
Your card and stamps are on their way.
In your card, you will have the coupon code for 20% off of your next purchase at Crackerbox Palace.
If you use your Sea Breeze stamp and post the card on your blog, or send us a picture, you get to choose another stamp for free.
Thanks for visiting our blogs.

I stamped the card, lightly colored it with Copic markers and put vellum over the image to give it a soft look.
Spellbinders  is the frame.
Share:

Saturday, June 23, 2012

Happy Fairy Dust Card

Hello, I have a fun fairy card today.
The saying, Happy Dust, was stamped and cut out with a die. The bluish marks around the saying are glitter glue.
I stamped Fairy Godmother and Fairy Bag, colored, and cut them out.
Happiness to you!
Vicky


Share:

Saturday, June 16, 2012

Mermaid Card

Hello, I had fun making this card.
Here are the stamps I used:
**I stamped all 3 of these and cut them out. I made the saying wavy like it might if it was underwater.
 I hope you enjoyed her,
Vicky


Share:

Wednesday, June 13, 2012

On The Way Train

This card I made for my husband for Father's Day.
I used  Crackerbox Palace stamps, I stamped it with VersaFine black ink. 
The train and background card stock is cut out from Spellbinder.
  I used Duster Brushes and Memento
brown ink to dust around the train. 
 I took the black Copic marker and colored around the
edge of the background card stock.
There are silver stickers on the edges but they are kind of hard to see.
Share:

Tuesday, June 12, 2012

Happy Father's Day Ride

Here is a idea for a Father's Day card. I just can't believe we are half way throught the year!
I made this card for my Father-In -Law who likes the older cars.
I stamped it on Ex-Press paper and colored it with Copic markers.
Hope the Father's in your life have a great Father's Day.

Share:

Sunday, June 03, 2012

Dad's Sail Boat

Currie Churchill made this card. It could be used for a birthday card or a Father's Day card.
It is a card that I think any guy would like to get.
The stamps she used were Crackerbox Palace stamps, Distress Inks and Tim Holtz paper scraper around the edges to rough them up. She also used brads for the top of the sails.
Share:

Thursday, May 24, 2012

Hope You're on Your small Feet

Another one with the feet...just loved these!
I had to do a quick card because I was going with a friend to see another friend that had ankle surgery.
I just used the paper that was already sitting on my craft table and used Spellbinders to cut out a couple of frames. The feet were colored with Copic markers.
I did stamp and cut out the flower, curled the peddles over and popped it up.

Share:

Tuesday, May 22, 2012

Happy Graduation

Here is another Graduation card. The last graduation card I did for a girl, this one is more for a guy.
You can easily change the background color of paper to match the school colors that you need.
Again, I used Spellbinders for cutting out the blue and the saying. I sponged the Sepia colored ink around the saying and also the blue.
I stamped the hat on the blue card to get the tassel, then I stamped the hat on white card stock, and shaded it with Copic markers. I cut out only the hat because I had the tassel already stamped on the card.
The diploma was stamped on light tan paper then colored and cut out.
I added the nail heads on the points of the blue card stock.

Share:

Sunday, May 20, 2012

Friendly Feet

These feet just make me smile.
I have the printed paper mounted on a couple of solid colores that match the print.
I stamped the saying and cut it out with Spellbinder Labels on the green and then the blue.
I looped the ribbon on each side of the saying and added the pearls.

Share:

Thursday, May 17, 2012

Happy Graduation Friend

I have already gotten graduation invitations. It seems hard to believe it will be time for graduation and the year half over.
I started with mounting the printed card stock on brown.
Cut a strip of another printed paper that matched the background paper and put it on the right side then put a ribbon on it.
Stamped the saying with VersaFine and embossed it, cut it out with Spellbinder. I lightly sponged the edges of the cut out with Sepia colored ink.
I stamped, colored with Copic markers, and cut out the rose and scroll.
I stamped the word Friend, and used a 1" punch and cut it out
Share:

Tuesday, May 08, 2012

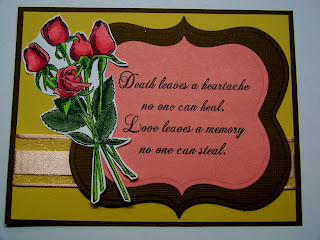
Roses on a Memory

I needed a real quick sympathy card and I thought I would share this one with you.
The card stock that the saying is on has been cut with Spellbinders.
The roses and saying are from our stamps. I colored the roses with Copic markers.


Share:

Wednesday, May 02, 2012

Dancing Feet

I thought this might be a good one for today since it is raining here in Janesville, WI.
I cut the dark red card stock and rounded the corners with a larger corner rounder.
I cut the blue card stock and punched the corner punch and then used a smaller corner rounder for these corners.
I stamped the feet on Ex-Press paper and used Copic markers then cut them out.
The feet are put on light blue paper that has spots of white in it and cut it small enough so it didn't go into the corners so the red card stock color came through..
The saying is stamped and embossed (that is why it's shinny and doesn't look the best). I cut it out with Spellbingder.
I glued the rain drops last.

Share:

Sunday, April 29, 2012

Sharing Popcorn


This is our popcorn bowl from Crackerbox Palace. I can eat popcorn any time of the year, but mostly it seems to be in the winter. Our weather this April is cooler than it was in March, so I am still thinking of popcorn.
The saying has been stamped and I used Spellbinder for cutting out the frame with the gray and blue card stock. The burnt orange I just cut a square and rounded the corners. You really can't see it in the picture, but I tacked down the bottom of the saying and used popdots on the upper part of the saying so it has a slight slant to it just to make it more interesting.
The bowl has been paper shaped and glued just around the outer edge. I scribbled a yellow marker on the image to add some butter to the popcorn-who doesn't like buttered popcorn? Then I dotted and swirled (very lightly) liquid applique around the popcorn and heated it up to get the puff for the popcorn.
The salt shaker, I first put some clear glitter glue (Stickles) for the salt, then added liquid lacquer over the entire glass area.

Share:

Saturday, April 14, 2012

Happy Birthday corner flowers

Happy Birthday was stamped with Crackerbox Palace stamps.
I cut out the design with Spellbinder in 2 shades of blue and put them together.
I added the pink flowers in the corners and the small pearls on the top, bottom and sides.
The ribbon was glued on the side.
I used a corner rounder punch around the image and the card.
Share:

Thursday, April 12, 2012

Butterfly Thank You

The envelope also has the saying stamped on it with dusted pink ink on the corner and the punched butterflies are also glued on the envelope.
The printed paper is only half the size of the card.
Punch the printed paper at the size you want the top part of the card.
Using the same punch, punch one edge of the colored card stock.
When you glue the printed paper on the card, only glue the top part of the printed paper to the top of the card. Slip the pink card stock under the punched edge of the printed paper.
The bottom of the printed paper, turn the printed paper around so the punched edge is hid under the pink.
The Thank You is stamped with Crackerbox stamp.
The buterflies are punched out of scrap from the printed paper.
There are large pearls next to the saying and smaller pearls on the pink card stock on the punched area.


Share:

Monday, April 09, 2012

Thinking of You Sweetly

This is a quick card without many frills (easy to mail)
Thinking of You was stamped and embossed and cut apart.
The edges around the words are inked in black.
The bowl, pie and plant were stamped, colored with
Copic markers and cut out.
The cabinet was also stamped, colored and cut.
I cut the top of the cabinet off.
.
This is the cabinet I stamped and cut the top off.


Share:

Sunday, April 08, 2012

Easter Basket

Currie Churchill made this Easter basket that is just the right size.
It will hold a lot without breaking your pocket book.
This is the front of the basket.
This is the side of the basket. She glued the sides and used a brad to hold the handle on.

Happy Easter!


Share:

Wednesday, March 21, 2012

Happy Easter Basket

This is the last of 4 cards I made at dad's before he passed away, so again I did not have many supplies with me.
The stamps are from Crackerbox Palace stamps and colored with Copic markers.
I had a stack of cut pieces I brought with me. The dotted background is one of them that I cut out with Spellbinders. It is layered on blue and then the card is a dark green that is the same color that is behind the pink card stock that has the image on it.
Share:

Monday, March 19, 2012

Easter Cross

This is another card I made at my dad's where I had very little stamping 'stuff'.  So this would be one of my quick cards.
I used Copic markers to color the cross and flowers.


Share:

Friday, March 16, 2012

St. Pat's Slainte

I used Crackebox Palace stamps.
I stamped the outline shamrock with Brilliance ink for the background on light tan textured card stock.
I layered it on textured dark green card stock. I used the same color of dark green for the biggest frame.
I cut all the frames with Spellbinder and stamped our saying on the same card stock I used for the card.
I stamped the image on white card stock and colored it with Copic markers. I used the Copic glitter markers for the beer, I almost made the beer green.
I made this at my dad's but if I would of made this at home, I would of used liquid applique for the beer foam.
Hope you enjoyed the card, and hope you enjoy St. Pat's Day!
Share:

Wednesday, March 14, 2012

St. Patrick's Day Wish

I am sorry it has taken so long to get back to my postings.
I know I have told you before, that I was living with my parents to take care of them until they left this life to journey on to the next one. My father just passed a couple of weeks ago and it has been a little hard for me. I will try to keep up with new ideas in between finishing up their affairs and getting my house in order since my husband was left to fend for himself the last 14 months.


I was able to make a few cards before dad passed away and this is one of them. I didn't have a lot of my 'stuff' at his house so the next few cards will be considered quick and easy.
I stamped the saying on light tan card stock and cut it out with Spellbinder. I left the die on and brushed light brown in around it.
I stamped the saying and shamrocks in green Brilliance ink. I also used the same ink to brush around the edges. I used Copic markers for coloring. Mounted the card on brown and then black card stock.
Share:

Wednesday, December 14, 2011

Chill of Winter

This is a pretty quick card to make if you are short on time.
I stamped the snowman and trees, then added the snowflakes in the background.
The candy cane was stamped on a seperate piece of card stock and cut out. I glued it to his hand but not to the card so it is lifted away from the card.
The image and snow was colored with Copic markers.
The saying was cut with Spellbinders.
Share:

Sunday, December 11, 2011

Santa is Coming To Town

I used our new Winter/Christma stamps.
I colored the image with Copic markers.
To get the halo effect around the outer edge of the card, I used a Colorbox Stylus with the white sponge attachment.  Put the tip of the stylus off of the card and bring it over the edge and lift up in a sweeping motion. You can do as little or as much as you like.
I added gliter on the snow on the ground and as also the roof.
Hope all of you are staying warm.
Share:

Shop Crackerbox Stamps

Search This Blog

Translate

Blog Archive

 
09 10